

DIY Pelican Hook Lanyards made using a Portuguese Sennit Knots
You can save money by making your own colorful Pelican Hook / Shackle Lanyards. They are quick and easy to make and you can pick your own colors.
Key Fobs make great Christmas and Birthday gifts for your non sailing friends.
These lanyards can also be used on shackles, the lanyards can be sized to match the shackle, large enough to give a good grip, but not too large where the lanyard will get in the way. Using bright colors make finding the release easier, the rough texture gives a good grip. Making your own lanyards lets you color code the shackles if you want.
I have given many Key Fobs & Pelican Hook Lanyards to friends and others as gifts, since everyone seems to like different colors, I made a large assortment of many different colors and line types then let people choose their favorite color.
Red & Green Lanyards work nice when given as a set to sailboat owners.
This knot goes by many names, Portuguese Sennit, Cobra Knot, Solomon’s Bar, Boatswains Plait and probably some others.
When used on the car keys , the difference in texture makes finding the keys in your pocket or purse easier. Some use the key fob on their ID badges for work to make finding the badge in their purse easier.
Types of twine to use? Most any small cord or twine will work. The nice thing about small twine is that it comes in many sizes, colors and types. I have had very good results using cord sized from just under 2 mm to about 3 mm. The largest cord I have used is 3 strand white cotton cord (# 120 Cotton Twine), about 4 1/2 mm diameter (3/16 inch), worked fine, but the downside is that white cotton gets dirty after a while.
For Parka zipper pulls, set the pins 1 1/2 inch to 2 inches apart and use a cord that is 2 mm ( 1/12 inch ) or a bit smaller, I have made several using sailing twine by Marlow. The 1 1/2 to 2 inch length makes a nice length to work with ski or work gloves.
The how to example uses Powers, Rounded MFP Braided line # 48 that I purchased in Seattle at Seattle Marine near Fisherman’s Terminal. The line comes in many colors, Red (use this if you want for Port lanyards), Green (Starboard), Blue, Yellow, and White. SeaMar also has several other styles and types of line. White line can be dyed with fabric dye.
REI in Seattle has 3mm Blue and bright Orange NiteLine that has reflective strips in the line.
Seattle Fabrics has a wide assortment of sizes and colors. One caution on Seattle Fabrics, they sometimes mix their stock, so if you find a real neat size & color, buy a bit extra if you think you might use it on different projects as once in a while I have went back to get a nice size and color only to find out it is no longer in stock.
Check the sailing section of Fisheries Supply, near Gas Works Park in Seattle for all sorts of colors and sizes of small line.
I bought an assortment of sizes and colors by Atwood Rope Mfg. from Lummi Fish (LFS Inc.) they stock the Atwood cord in their Bellingham, Washington store. Atwood Rope also sells from their website. I like the 3/32 Tactical Cord with the 4 strand core.
The pins on the wood block that set the length of the Pelican Hook Lanyards & Key Fobs are 3 3/4 inches apart for Pelican Hook Lanyards and standard Key Fobs. The two pins next to each other are 1/2 inch apart. I used short pieces of 1/8 inch brass welding rod. Make sure the pins do not have sharp edges that might cut you. Use what ever you have on hand, nails will work. If the holes are drilled so the pins are a slip fit, the pins can be adjusted for different lengths.
The loop at the end needs should be 1 1/4 to 1 1/2 inches long for a Pelican Hook or Shackle lanyard. The loop needs to be large enough for the Portuguese Sinnet to pass through the loop when the lanyard is attached to the release ring on the Pelican Hook. For Key Fobs the loop can be about 1/2 inch long.
Adding a small coin sized flashlight with a key ring to a key fob makes a great. Having a small flashlight in a pocket or purse can be very handy for those times when a bit of light is needed.
Key fobs with a small flashlight makes a very popular gift to friends, the small flashlights can be found online starting around $ 1.50 each, I purchased mine online from Battery Junction or Bright Guys depending on which model I was looking for. The coin sized flashlights come in different colors including white, red & green.
The demonstration used about 58 inches of the Powers # 48 Round Braid.
I melted the green and yellow twine together to make it easier to see how the cord is routed. I have not used two cords stuck together for real projects. I am cautious about the two colors stuck together and I don’t like the hard spot where the cords are melted together. However I have seen several books and web sites that do melt two cords together, so try melting them together if you want, just be cautious.

Different colored versions of the Spiral Portuguese Sennit, key fob
For a spiral version see: Making Spiral Pelican Hook Lanyards & Key Fobs
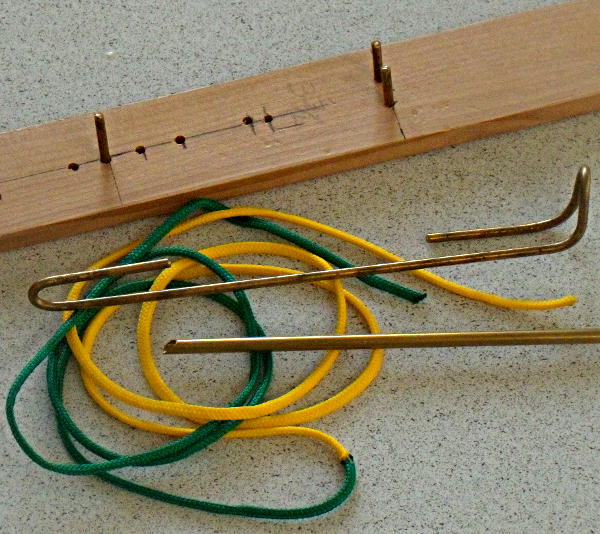
The materials & tools for making your own Pelican Hook Lanyards & Key Fobs
Tools used, a piece of scrap wood with pins in it to help start the Pelican Hook Lanyard on and aids in making them all the same size, small line / Para-Cord / Net Twine or other line to make the lanyards from, a bent rod to help hold the lanyard during construction. The round brass rod with a bevel on the end is to help finish the lanyard.

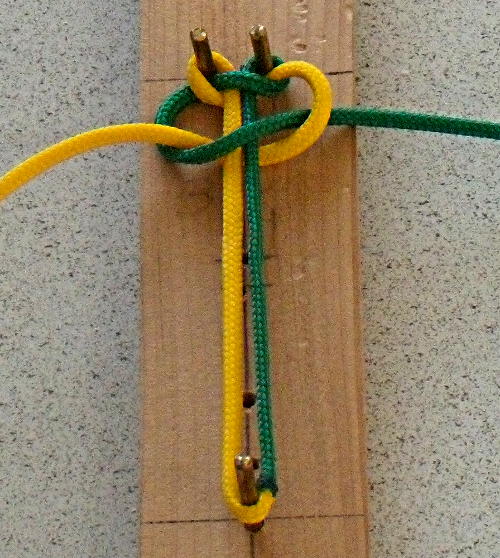
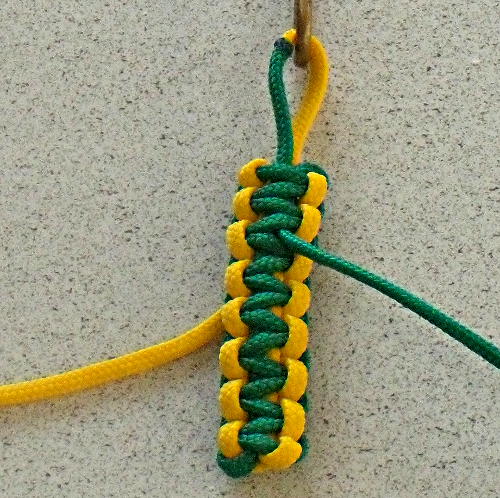
Step 1 – Starting a Pelican Hook Lanyard – Key Fob
Step 1 thread the cord as shown around the pins. The pins are not needed, but they make starting the lanyards easier and each lanyard or key fob can be made the same length.
To make a flat lanyard or key fob, keep the cords on the same side of the center section.
If a spiral weave is wanted the cords can be crossed over to the opposite side, make sure to cross in the same direction.
Pull the first knot up snug but not drum tight.
The knot or weave used is the Portuguese Sennit or Cobra Knot.
Step 2 – tying the second knot.
Step 2 – tie the second knot keeping the cord on the same side of the center section, keeping the cord on the same side will give a flat braid.

Step 3 – Pulling the slack from the starting section.
Step 3 – Remove the Pelican Hook Lanyard / Key Fob from the pins. Gently pull the slack out of the loops where the pins were.

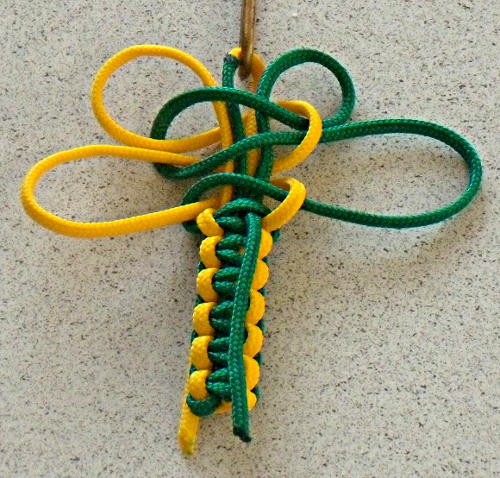
Step 4 – Continue with the Portuguese Sennit.
Step 4 – Continue with the Portuguese Sennit until four knots short of the amount of the Sennit wanted.
using a hook (or piece of line) of some sort will make tying the Sennit much easier.
Pull the Sennit “snug” but not too snug.
If the Sennit is pulled too tight the Pelican Hook Lanyard or Key Fob will be very stiff and difficult to bend. Too loose and the Sennit can loosen up.

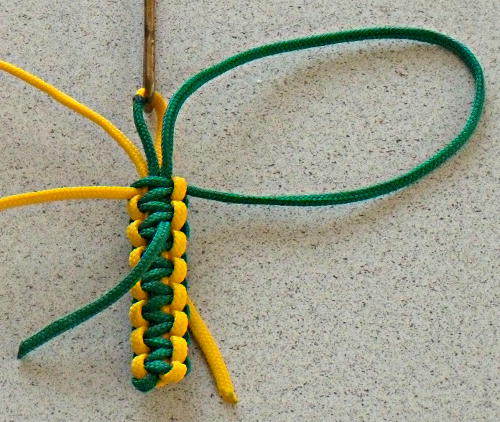
Step 5 – The Portuguese Sennit stopped short to allow the ends to be threaded back though the center of the Sennit.
Step 5 – I leave the last four knots loose so the end of the cord can be threaded down through the center of the knots.
Make sure you leave a large enough loop for your intended use, about 1 1/2 inches for a Pelican Hook / Shackle Lanyard or 1/2 inch for a Key Fob.
The cord is looped around the cord from the other side of the knots and threaded down the same side of the knots as the cord is on.
This gives a nice neat rounded finish next to the loop.
I use a piece of brass tube with a bevel filed on the end to make the threading easier, if you are only making a few lanyards or key fobs the cord can be threaded through the center without using the tube.
Some people pull the Sennit down and thread the end of the cord through the center without the two step that I use, but I have yet to get the single step down.

Step 6 – Showing the ends of the cord threaded through the center of the Sennit.
Step 6 – The cord has been threaded down though the center of the knot and is ready for the slack to be taken out and the knot snugged down.
Step 7 – One knot of the Sennit has been pulled down tight on the end of the cord.
Step 7 – The first knot has been tightened, three more to go. I like to snug down the last four knots to hold the end of the cord so it won’t slip out.
I have this fear of the end of the cord slipping out so the last few knots holding the end of the cord are pulled fairly tight..
Step 8 – The Portuguese Sennit has been finished and the slack is ready to be pulled out of the cord.
Step 8 – The Sennit knots have been tightened.
Pull the slack out of the loop. Just take the extra slack out of the loop, no need to reef things down extra tight.
Step 9 – The slack has been pulled out of the cord.
Step 9 – The Sennit has been tightened and the extra cord is ready for trimming with a pair of scissors.

Step 10 – Finished and ready to use, the extra cord has been cut off close to the Portuguese Sennit.
Step 10 – The extra cord clipped off close to the Portuguese Sennit and the lanyard is ready to use.
Some don’t pull the cord back into the center of the Sennit, but they leave the cord a bit long where it finishes off then using a hot knife rivet the end of the cord over. I don’t like the rivet as it leaves a hard spot and depending on the temperature of the knife the end of the cord can be burnt leaving the end of the cord blackened.

Step 11 – Finished Pelican Hook Lanyard being used as a Key Fob. The lanyard is attached to the ring with a “Luggage Tag”
Step 11 – The finished lanyard being used as a key fob. The lanyard has been attached like a Luggage Tag (looks like a ring hitch also)
When I make Key Fobs I make the loop about 1/2 inch long and thread the loop directly to the key ring.
Most small coin sized flashlights come with a key ring. The small flashlight comes in handy from time to time.


Different colors and types of cord, let your imagination run wild!

Soak the top of the Pelican Hook Pin with dry lube
You might also find this useful: Simple tips to take the mystery out of the Pelican Hook.
Thanks for your interest in and support of boating safety.
c/m


Really nice job on the lanyard instructions, Mike!! The pictures are great! Thank you for sharing.
Deirdre B.
SSYC
Thanks – glad you liked the instructions –
This was perfect! Thank you so much for putting this online. We just were able to add our personal touch to our boat because of this! So much more rewarding then just buying them online.
Glad you found the information helpful to add that “personal touch” to your boat
Thanks for stopping by