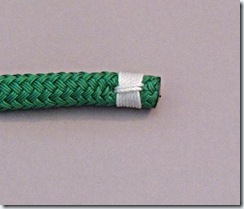
This is the quick and secure whipping I use to whip the ends on double braid line. I have not seen this in any book. It has some of the elements of the classic quick temporary whipping but this method is much more secure and almost as quick as the classic quick temporary whipping. Properly whipped line ends in addition to keeping line ends from fraying also helps give your boat more “style points” and adds to your reputation as a knowledgeable sailor.
Whipping the ends of the line with this whipping is much easier for me to do than the classic regular whipping that has two frapping turns at 90 degrees from each other and the tough (for me anyway) ending knot and bury. I use a single set of frapping turns to hold the whipping together with a quick secure bury of the two ends of the whipping twine.
I have been using my quick rope whipping on my boat and boats of friends for many years and my quick rope whipping has worked well. I have had many friends specifically ask me to bring my ditty bag with whipping supplies in it when I go sailing with them to fix the ends of their lines.
Many books recommend putting two whippings on the end of a line in case one comes undone. I don’t like the second whipping as that makes the end of the line stiffer and more difficult to handle. I make it a point to inspect the whipping on a regular basis and replace any that look tired. If a whipping starts to come loose a quick Double Constrictor Knot will keep the end of the line together until a regular whipping can be applied if enough time is not available for this quick rope whipping.
Whipping twine is available in many sizes, colors and types. I use colored whipping for coding and marking many of my lines (Marking Your Halyards). I use regular Dacron / Polyester waxed whipping twine for almost all rope whipping. I do keep a roll or three of the more exotic materials for the times I need stronger small stuff or twine.
A strand can also be taken from the cover of a scrap of line and used as whipping also, just remember to wax the strand with some Bee’s wax. If you use a strand from the cover of a scrap of line it will match the base line color.
Whipping the ends of rope or line with this method sometimes does not look quite as nice as the fancier whipping but this is much easier for me to whip the end of the line than the more involved and traditional ways.
Now you have no reason for not replacing that ugly tape on the ends of your braided lines or having frayed lines on your boat.
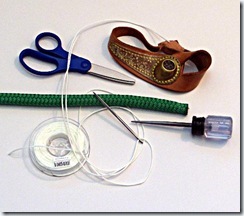
The required materials: Waxed Whipping Twine, Sail Makers Needle, Sailmaker’s Palm (to push the needle through the line), scissors and small fid (this is a modified awl from the hardware store). Having some Bee’s Wax in case the wax on the whipping twine is not heavy enough or you decide to use line that is not pre-waxed. |
|
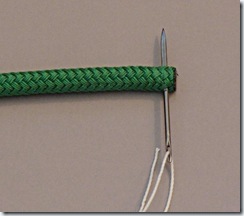
Start by pushing the needle and twine through the center of the line using the Sailmaker’s Palm to protect your hand. You will work from the end of the line toward the center. Sail maker needles are triangular in shape, the edges of the triangle are rounded to open up the material they pass through without damaging the fibers. The point of the needle is very sharp and care should be taken to not stick yourself. |
|
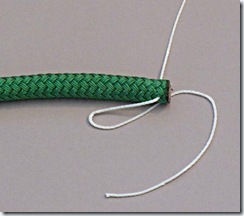
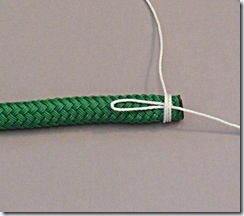
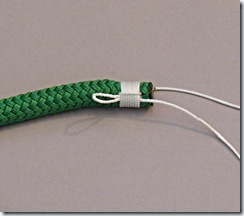
Form a loop with part of the tail of the twine. Leave several inches of twine for a tail, this tail needs to be long enough to grab onto and pull on quite hard. |
|
Lay down the loop as shown and wrap the whipping twine snuggly around the line. The wrapped length should be about equal to the diameter of the line. |
|
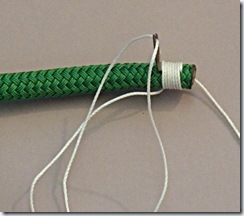
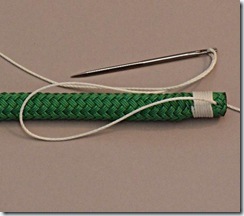
After you have the desired length of whipping thread the whipping twine through the center of the line toward the loop side. Use your Sailmaker’s Palm. Line up the entrance with the exit of the line at the start. |
|
When you come through by the loop DON’T go through the loop, come up along side the loop. |
|
I only did a so-so job lining up my stitching through the line in this picture. But things should still work out fine they will just look a bit off. |
|
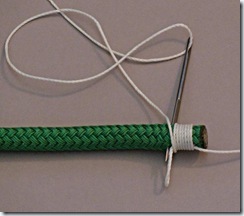
Wrap the whipping line length wise on the whipping then thread the whipping twine down through the center of the line and pull the stitching snug. This is the start of the frapping turns the will hold the whipping together securely. |
|
Thread the whipping twine back down where you started the first frapping turn. I usually try and capture the earlier threading through the line to help pull the whipping together a bit better and give a nicer looking whipping. |
|
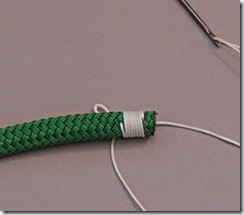
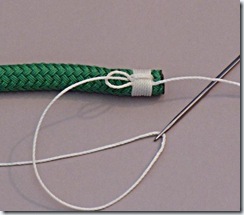
After the second complete frapping turn is completed thread the whipping twine through the loop. The frapping turns should be smooth, tight and don’t cross over each other. If one of the frapping turns crosses over the other, the frapping turn that crosses over will wear quicker. |
|
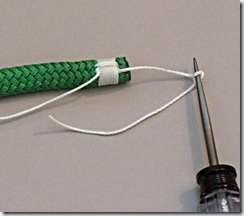
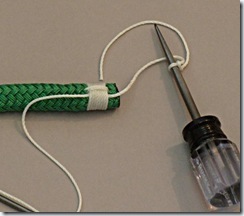
Pull the slack out of the loop and then tie the whipping twine to a fid or other object, this is to protect your fingers when the loop is buried. If the whipping is done correctly and snugly, burying the loop will be difficult. |
|
Pull the loop carefully to the center of the whipping. This will result in both ends of the whipping twine being buried with the crossover at the center of the whipping. |
|
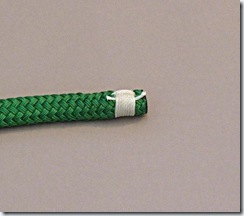
Clip the extra whipping twine and you are finished. I usually leave a bit of a tail. |
Thanks for your interest in and support of boating safety.
c/m



Pingback: Improved Fender Whip–Part 1 | Boating Safety Tips, Tricks & Thoughts from Captnmike
Great Method, I will this and share it with other and seascouts
Hope your Scouts find this useful – people struggle with whipping the ends of their lines – sometimes I demo this in class and students can’t believe how quick it is. Good luck & thanks for your work with the Sea Scouts
Hi CaptnMike,
So do you end up with two sets of visible frapping turns; one on one side and another on the other side (180 degrees around)?
Cheers,
Roger
There are a pair of frapping turns – they go through the center of the line and are alongside each other. They are visible 180 degrees apart on the line and are the same pair of turns.
Good luck with your boat. I hope some of the other articles here also help you.
Super, thanks.
Not necessarily knowing what a frapping turn was beforehand, I was a bit confused at Step 7. I did it this way and it worked but was just checking.
It certainly is a lot simpler than the whipping I did the other day from another source so I think this has quickly become my whipping of choice, as per the KISS principle. Thanks CaptnMike! (and yes, much of your stuff is useful for a new sailor like myself).
yes much simpler and very quick – I sometimes demo rope whipping in class or for groups and when I am finished, many times the reaction is “wow is that easy” or something like that
Glad you found some useful information here, since I have no ads my only “payment” in a way is seeing people visit my site and sometimes leave a nice comment
Do you happen to have a video of this? I have tried by looking at the pictures but I just can seem to figure it out. If not, no problem, I’m sure I’ll get it eventually.
Thanks!
Sorry I don’t have a video for this – last week another person suggested I add videos to my site – but I am not quite there yet (but do have some ideas for videos)
My only suggestion would be to get a needle and twine and try stepping through the instructions –
Is there a specific step that is throwing you? If so maybe I can add a bit to the instructions
Hi Mike, I just sent you a whipping that I came up with myself (by way of your Contact Form) that is based on the use of multiple stacked constrictor knots. It is my guess that it is not as fast as your technique, but for me it has proven to be indestructible. I have never had one loosen, fail or need replacing.
West Country is a series of Half Hitches or what looks like a series of half square knots is another whipping that might be similar to what you are doing. I have never used the West Country Whipping but have used Double Constrictor Knots many times for quick temporary whipping. Sometimes I will putt two knots about a rope diameter away from each other if I don’t think someone will replace the constrictor knots, but even a one double constrictor knot seems to work well and hold up to the weather if the proper small stuff or twine is used.
Sorry have not seen anything from the contact form.
good instruction on securing cut rope. Sailor braiding is a lost art. Sail sewing makeing nets ect. Is there a site or a web site that sells instructions on DVDs on this lost art. Today’s prepares this is a must learned art. Even if your not by water you need to sew tents and shelters.
Try Sailrite – they have instructions for sewing almost anything – they also have a help forum if you have general questions