Tying a Bowline is an essential boating skill but one that seems to stump many boaters, then when you add being left handed to the mix things can get really confusing so I made this guide to help left handed people tie a Bowline.
A few years ago while helping to teach knot tying at the Mountaineers Sailing Crew Class I noticed that many of the students were left handed and really struggling with tying the Bowline.
I then taught myself to tie the Bowline with my left hand and this helped as I could now demonstrate how to tie a Bowline with my left hand and letting them look over my left shoulder did help quite a bit. But as with all teaching, doing something in class and being able to do the same task once a student got home were two very different things.
I then got together with a friend who took these pictures while I tied the Bowline left handed and then I made a one page handout (see below for a printer friendly version) that I started giving out in class, that handout has been expanded below to help the about 10% of the population that I have been told are left handed.
The Bowline is used any time you need a fixed loop in the end of a line that will stay the same size. Common uses are, Jib and Genoa sheets, loops in the end of dock lines, fenders and lock lines. The Bowline can also be untied even after it has been heavily loaded.
The Bowline is also called the King or Queen of knots as it is very flexible knot that can be used in place of almost any knot on a boat, granted sometimes a bit inelegantly.
If a person only learns how to tie one boating knot the Bowline should be that knot. You should practice tying all knots until you can tie them blindfolded. The sort of joke I tell students about the Bowline is learn to tie it hanging upside down, blindfolded with someone pouring cold water down the back of your neck because if you sail long enough you will probably need to tie the Bowline in while in that position.
There are many ways to tie a Bowline one of the biggest mistakes made by instructors is to “showboat” and show a student many ways to tie a Bowline with the end result being the student is totally confused and discouraged. I always recommend that a person learn how to tie a Bowline using ONE method before trying a second way.
A few hints and tricks:
- Have the standing part going away from you, don’t tuck it behind your hand, very confusing if you tuck the standing part behind your hand.
- Use a small first loop with a large second loop, this is a visual thing, reversing the sizes really confuses people.
- Don’t worry too much about the size of the main loop, it can be changed quickly and easily once you have the Bowline tied.
- Don’t get in a hurry at the end to pull the extra slack out of the Bowline, if the slack is pulled out too quickly the Bowline can pull into a strange shape, I have literally had students come into class crying after spending the whole week not quite tying the Bowline and all they were doing wrong was pulling the slack out too fast.
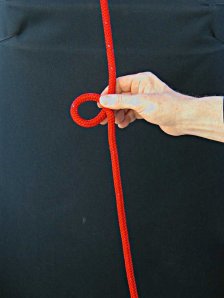
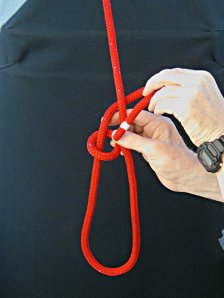
The standing Part should go away from you. DO NOT wrap it behind the right hand Start with the line going away from you. Make a small overhand loop in the line with your left handThe line in your left hand should be on top |
|
The loop in your right hand should be small. You want a LARGE bottom loop. A small top loop and large bottom helps visually |
|
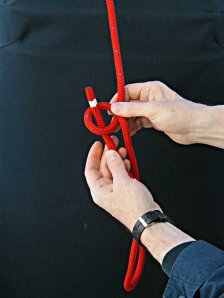
Bring the end up through the small loop. |
|
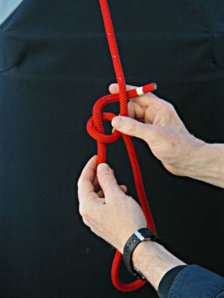
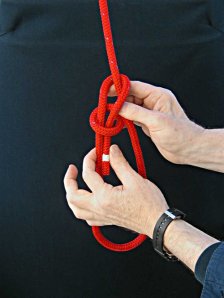
Duck the end behind the standing part of the line. |
|
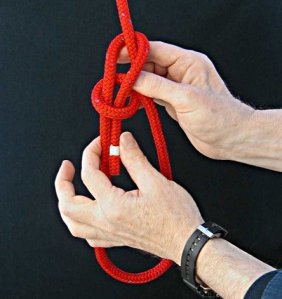
Feed the end back down through the small loop along side itself |
|
Hold the end and gently work the slack out of the knot. Patience here – Do not rush things |
|
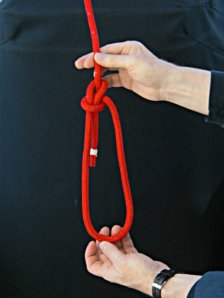
The completed Bowline A small upper loop and large lower loop. Adjust the loop size if needed. |
One page printer friendly handout (PDF).
Thanks to Lee Youngblood a longtime friend, Yacht Broker and photographer for taking the pictures and putting up with my point and pray camera.
Thanks for your interest in and support of boating safety.
c/m




Thank you so much for helping out us left-handed people! I need to know this know for safety around my horses and farm. In spite of his best, patient efforts, my brother has not been able to teach me this knot. Actually, it is my inability to learn it from his right-handed teaching! Thank you.
Glad I could help – for my teaching I had to learn how to tie the Bowline with my left hand to effectively teach it to left handed people. Telling someone to just do it reversed just does not work.
Thanks. Have provided a link to the printout for those left-handed “students.” http://scoutpioneering.com/links/
I would have preferred a link to the Post here and not straight to the PDF – but glad I could help your Scouts
I call that the captain Kev Knot, as i aeappr to be the only person that can do it. I have an easier way that I will video for you.I also call it the fire mans hitch.But I like the name highwayman’s hitch.Best regardsCaptain kev
A great site. Thanks.
You be welcome – glad you found useful information –
pass the site on to your friends –
Pingback: Skipper Emeritus | Boating Safety Tips, Tricks & Thoughts from Captnmike